
When embarking on a project to build your own deck, there are many considerations to take into account to have a successful project at the end of the day. The deck beams are one of the most important aspects of a successful deck, and it’s imperative to construct them properly.
To build a strong deck beam yourself, you will construct a stronger beam by using multiple pieces of wood.
The beam is an extremely important part of the construction of any deck. It’s therefore essential to ensure that it is built correctly and that it possesses sufficient strength to ensure that it can withstand the forces of the deck above it. When building a deck beam as a DIY project, there are several ways to make the project easier for yourself.
Deck Beams; A Practical Construction Guide
The deck beam rests on the deck posts and supports the joists and decking above it. Because of the significant loads placed on deck beams, they generally have to be relatively large pieces of timber.
While a single plank can be used for a beam, the loads placed on them may call for several pieces of timber to be fastened together to form a beam of sufficient strength. The wood used is usually 2×8″, 2×10″, or 2×12″ in size. Check out IRC for required deck beam sizes if you are unsure. Canadians check out the Prescriptive Residential Exterior Wood Deck Span Guide.
A small attached deck usually requires only one beam along its outermost edge running parallel. This beam – along with the ledger board that is attached to the house – will provide sufficient support for the deck.
When building a larger deck, an additional beam may need to be installed in the center of the deck to provide sufficient structural strength. This is depended on the allowable joists span.
*Builders Tips*
Joist can roughly span joist depth x 1.5=feet of span.
2x(8×1.5=12′)
In the past, beams were often made of single pieces of timber such as 4x6s or 4x8s. This is still done today, but handling such large pieces of timber can be extremely difficult, especially under the circumstances of a DIY project.
Single ply timbers are also more likely to warp and twist, limiting their value. Plus larger timbers are cut from larger trees that are rapidly increasing in cost.
Your best option a built beam, in which multiple 2-inch-thick pieces of wood are fasten to one another in order to create a beam that will, in fact, be stronger than a single 6″ beam.
There are 3 Common Ways to Build a Built-Up Deck Beam That Will Last.
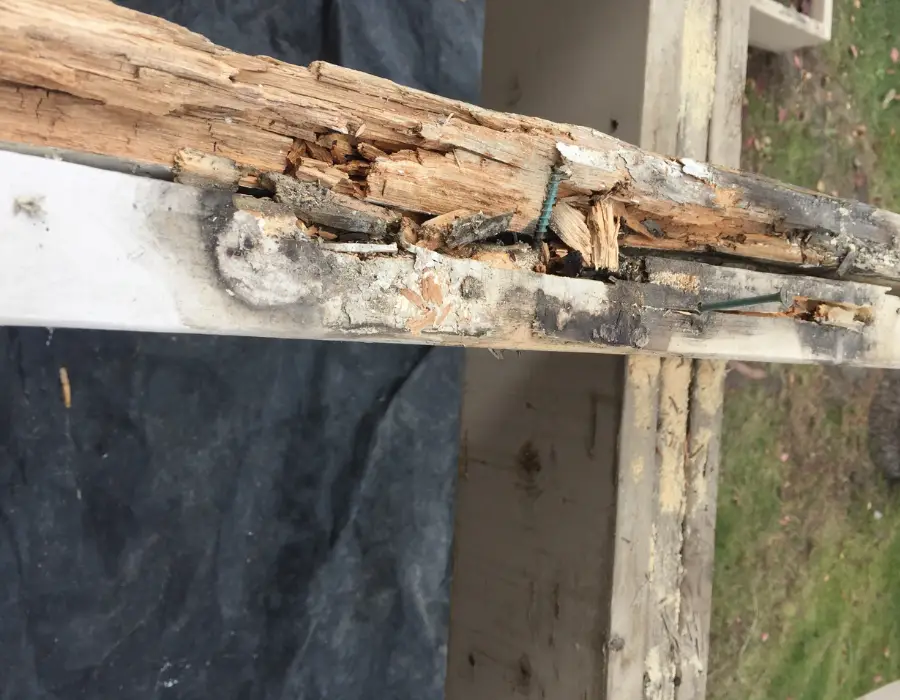
Next to poor construction, the biggest reason for beam failure is rot. Rot caused by water sitting on the top of the deck beam. These three deck beam designs address the problem of water, ensuring that your deck beam will last.
- Deck Beam with Spacers
- Deck Beam Sandwich on the Post
- Membrane Protected Built-up Beam
Read all 3 designs and see which will work best with your deck build.
Tools For Building a Deck Built-Up Beam
Regardless of which one you choose, you will need these few basic tools.
- Drill/Impact driver
- Hammer
- Circular saw
- Clamps wide enough to clamp the depth of the board
- Tape measure
- Brush & End Treatment
- (2) Sawhorse/work Benches
Optional Tools if using Carriage bolts
- Drill
- 3/8×6″ drill bit
- Socket Wrench
Constructing A Beam with Spacers
One way to build a build-up beam that doesn’t pool water is by installing small spacers between the beam’s plys.
Material required for Beam with Spacer
- Dimensional wood for Beam (2-5 plys as needed)
- 3″ deck screws or Galvanized coat nails
- 1 ¼” deck screws
- 3/8″ x 6″ carriage bolts* with washers and nuts
- ½” Treated Plywood strips cut the height of the beam with 1 pointed end
*Adjust bolt lengths according to the number of plys.
- 2 plys/4″
- 3 plys/6″
- 4 plys/8″
To begin with, place the place the wood on top of each other while ensuring the crowns all face the same direction. Ideally, on sawhorses to save bending over. Square off the ends of the members and cut them to the desired length. It’s recommended to cut an angled piece off the corner end of the beam. No more than 1/3 of the height of the beam (2×10 only 3″ high). Treat the end of the beam with end treatment to prevent rot.
The next step is to cut spacers using ½” plywood (pressure-treated). By cutting the top end of the spacer into a point, you will prevent water from accumulating on top of the spacer. Fasten the spacers to 1 ply of the of your beam 16″ on centre using 1 ¼” screws.
*Builders Tips*
If the board is crowned, clamp and fasten one side and work from one end to the other. Clamping, straighten and fastening as you work from one end to the other. Way easier than fastening each side and then trying to straighten the middle.
Once your spacers are attached, stack another beam member on top of the one with spacers (with the spacers sandwiched between the two members) and clamp them together, ensuring the ends are perfectly aligned.
Once clamped, drive your 3″ screws/nail through the beams at 16″ intervals.
If attaching more than 2 plys, attach plywood strips on the next ply. Make sure that they line up with the stips below. Lay next ply ontop, clamp, straighten and fasten as required.
*Builder Tip*
If the finished beam will be to heavy to lift into place. Place the first 2 plys on the deck posts and clamp and straighten in place.
Repeat this process until all the beam plys are fastened together.
The next step is to create the holes for the bolts that will hold your beam members together. Begin making these holes around 2 inches from the edge of the beam, top and bottom. Ensure the drill bit is the same diameter as your bolts. Repeat this every for every plywood strip across the entire beam length.
*Builders Tip*
Substituting GRK Fasteners saves time by not requiring predrilling but have with similar strength as carriage bolts.
Now that the holes have been created, insert your carriage bolts through each hole before tightening the nut using the socket wrench. You may need to tap them with a hammer to push them through the beam.
Your beam is now complete. The next step is to place the beam/s on top of the posts, fasten to the beam either with beam connector hardware or toenail the beam to each post before continuing with your deck construction.
Beam Bolted to Post Option
Using the post as the spacer between the beam plys.
Material required for Bolted Beam
- Dimensional wood for Beam (2)
- 3/8″ x 6″ carriage bolts* with washers and nuts
An alternative option will use two individual beam members and no spacers. This method employs two beam members placed on either side of the vertical posts. This creates a strong beam with the vertical post sandwiched between the beam’s two members, allowing water to run off the beam.
*Builder Note*
A 2 ply built-up beam, with the plys, fasten tight together, will be stronger and more rigid than 2 single-ply beams.
Position the beam pieces on each side of the post using temporary supports or clamp. Once in place, drill thru the beams and post and fasten together with the required number of carriage bolts, washers and nuts.
Again GRK screws instead of bolts will save you time.
How To Construct A Built-up Deck Beam
Full disclaimer, this is my favourite method and how I construct most of my deck beams.
Material required for Built-up Beam
- Demensional wood for Beam (2-5 plys as required)
- Galvanized coat nails
To begin with, place the wood on top of each other while ensuring the crowns all face the same direction. Ideally, on the sawhorses to save bending over. Square off the ends of the members and cut them to the desired length. Treat cuts with end-cut treatment to prevent rot.
*Builders Tips*
Cutting the angle cut after the two plys are attached will create a cleaner cut with the ends lining up.
It’s recommended to cut an angled piece off the corner end of the beam. No more than 1/3 of the height of the beam (2×10 only 3″ high). Treat the end of the beam with end treatment to prevent rot.
Stack 2 ply beam on top of each other and clamp them together, ensuring perfectly aligned ends. Again working from one end to the other will make straightening the boards easier.
Once clamped, drive (3) 3″ nails through the beams at 16″ intervals. Roughly 2″ from the top, bottom and centre. Nails are stronger than screws unless you use structural screws such as GRK screws. Standard deck screws can be used to hold the plys together before driving GRK screws through the entire beam. Less GRK screws are required than nails but check the package for the correct spacing and number.
If attaching more than 2 plys. Lay next ply on top, clamp, straighten and fasten as required.
Repeat this process till all the plys of the beam are fastened together.
Your beam is almost complete. The next step is to place the beam/s on top of the posts. Fasten either with beam connector hardware or toenail the beam to the posts before continuing with your deck construction.
“Wait! Won’t the beam rot with water sitting on top?”
To prevent the beam from rotting, install joist membrane on the top of the beam folding the edge over the edge of the beam. You will need to use crayon or colour felt for joist layout with pencil not showing on the black tape.
The tape on the beam protects the beam from water and rotting but takes less time to install and cost less than plywood spacers. Which is why I prefer this method over plywood spacers.
Types Of Deck Beams
There are two main types of deck beams. Your choice of beam type will significantly affect the construction of your entire deck.
Flush beams are placed at the same level as the deck’s joists. The joists are attached using joist hangers. This type of deck beam is generally used for small decks or those where a dropped beam would not be able to function.
Ground-level decks without sufficient clearance are often better supported with a flush beam.
A drop beam, on the other hand, is placed underneath the joists. This allows the beam to support the entire weight of the structure above. Because the strength of the structure lies in the actual support of the timber members as opposed to the metal fasteners used in flush beams, this makes for a stronger structure.
Drop beams provide better support for the joists being under the joists instead of hanging from them by hangers.
Plus, installing joists on a drop beam is faster than a flush beam, Just in case its all about speed.
This type of beam also allows for cantilevering of the deck. This helps to partially conceal the posts underneath the deck, making for a more aesthetically pleasing deck overall.
By cantilvering the joists, the beam becomes less of the deck’s focus. Which can improve the aesthetics of the deck.
It is not a hack, but it also allows you to hide slight imperfections of the beam’s appearance and location.
Conclusion
While in earlier times, a single piece of large timber was used as a deck beam, current construction methods employ the use of multiple pieces of timber fastened together to create a stronger beam that is easier to work with. By following the methods illustrated above, you should be able to construct your own deck beam with ease.
Plus with less rot you will be able to enjoy your deck for many years to come.
Sources
https://lakeofbays.civicweb.net/document/59194https://hebronct.com/uploads/2014/03/AWC-DCA62012-DeckGuide-1405.pd
https://www.decks.com/media/550h2kam/software-deck-guide-1.pdf
https://www.finehomebuilding.com/project-guides/decks/ultimate-deck-build-2015-building-and-leveling-a-beam
https://inspectapedia.com/decks/Deck_Beam_Install.ph
https://www.bhg.com/home-improvement/deck/building/how-to-make-a-deck-beam/