If you are new to deck building, you might be unsure whether the decking should run parallel to the house or if there are other options. If building a deck beside your house, there are two common options of construction. Either a deck attached to the house with a ledger board. Or a freestanding that is supported with footings and a beam entirely and is not attached to the house.
The question about running the decking parrel or not will be determined by the joists.
Decking must be installed in the opposite direction of the deck joists. If the joists are perpendicular to the house, the decking will be parallel. If the deck is freestanding with the joists running parallel to the house, the decking will be perpendicular.
This does not mean a freestanding deck must have perpendicular decking, but it is an option.
Unlike an attached deck which the decking must be installed parallel to the house. The only exception is if you have a jog in the house. You can install the ledger on one side of the house while running the decking perpendicular to the main part of the house.
This is not very common but can be done.
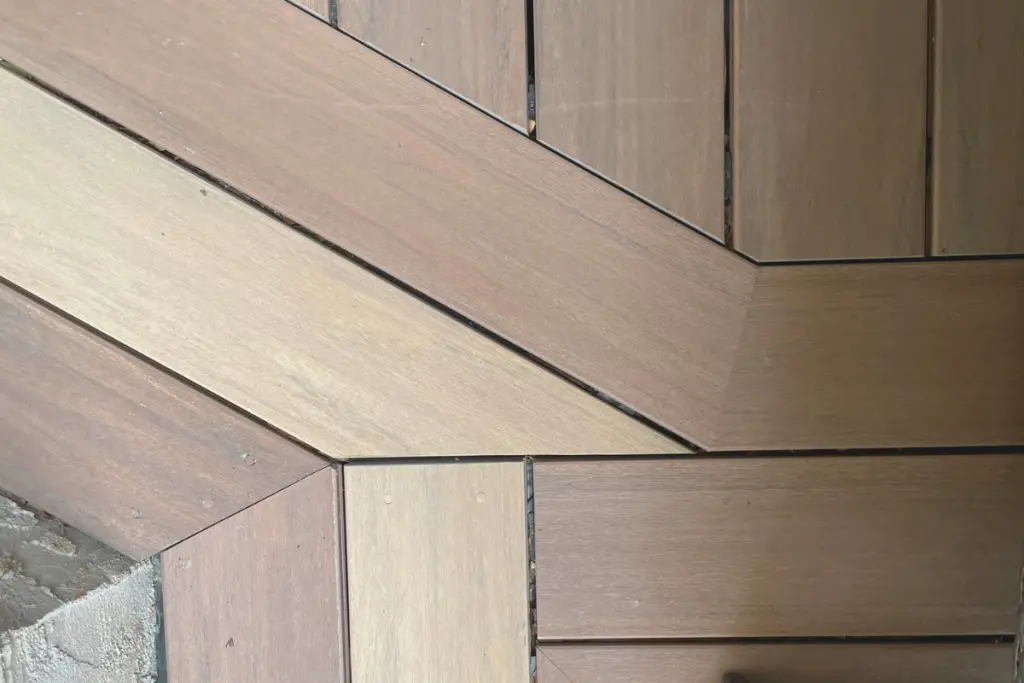
A third option, regardless of the direction of the joists, is to run the decking at an angle. You do need to reduce the spacing between joists to provide the same level of support, but it can enhance the appearance of the decking.
But why is decking installed parallel is the most common direction?
There are three main benefits of running decking parallel with the house.
- Construction
- Water runoff
- Appearance
Let me explain these reasons a little more to see if they are valid for your deck.
Running decking parallel to the house is easier for construction.
An attached deck is supported with a ledger fastened to the house and a parallel beam. The beam is appropriately spaced from the house based on the deck’s size and joist span. Joists are attached to the ledger with hangers and with the far side supported by resting on or hangerred to the beam running perpendicular to the house.
With the decking runs parallel to the house, resting on the joists perpendicular.
A basic design is the most economical deck design. Requiring the least amount of material and work to support the decking.
Decking running perpendicular to the joist requires the least amount of joists, with the decking able to span larger spaces.
Plus, the rim joist attached to the house becomes a ledger, reducing the number of beams and footings required.
A simple design, using the least amount of material, saving you the most amount of money.
Decking running parallel to the house ensures water drains off the deck to the ground
Decking sloping away from the house minimizes the amount of water running into the house from the deck.
But decking running perpendicular to the house collects water the length of the decking, increasing the amount of water. So if your deck is improperly slope the potential for water damage by the house increases.
A free-standing deck, slightly gapped away from the house, will minimize this but not as much as decking running parrel. With a much smaller distance between teh gaps in relation to the house.
Minimizing the amount of water getting to the house.
I discuss deck slope and water runoff in greater detail in another article. If you would like to learn more. Short of it is, gapped decking parallel with the house diverts the most water away from the house.
Decking running parallel to the house is aesthetically beneficial
Yes, beauty is in the eyes of the beholder, and there are some wonderful decking designs that do not run parallel with the house.
But the simplest is rows upon rows of decking leading up to the house. Standing in the yard looking back at the house. It’s nicer to look over rows of decking than looking down the length of the decking.
Lines of decking define space.
Decking running parallel to the house makes the deck look wider and blends the deck into the house. If the decking runs perpendicular, the deck looks long and extends far out, away from the house.
Often the house siding also is running the width of the house, and parallel decking reflects this pattern. Taking on the appearance of a reflection of siding on a lake as the decking. As humans, we often enjoy consistency. Too much variety with lines is interpreted as chaos, something we all feel uneasy about.
Decking should run parallel with the stair treads.
Often the deck is the bridge between the house and the yard. We walk over the deck from the door to the yard. With the door opposite the stairs on the deck. Providing an efficient path to the yard.
Not required on exterior decks, but inside your house, hardwood must run parallel with the stair treads or have a border that does.

This is for safety to make us aware of the step visually. Our eye is unconsciously noticing the lines along the planks and looking for the edge. Where boards are running perpendicular, think of it going on endlessly, not looking for the edge.
Again, not all stairs our opposite of the door, but commonly are. Having the decking running parallel to the house help with stair safety.
If stairs are on the side of the deck, it’s a good idea to picture frame the deck. The picture frame provides and parallels the deck board to the treads while hiding the perpendicular decking ends.
Other decking design options
There are many more decking layout options than parallel and perpendicular. Different layouts will create a different feel on your deck. But they will increase the cost with additional labour and material required to support the decking.
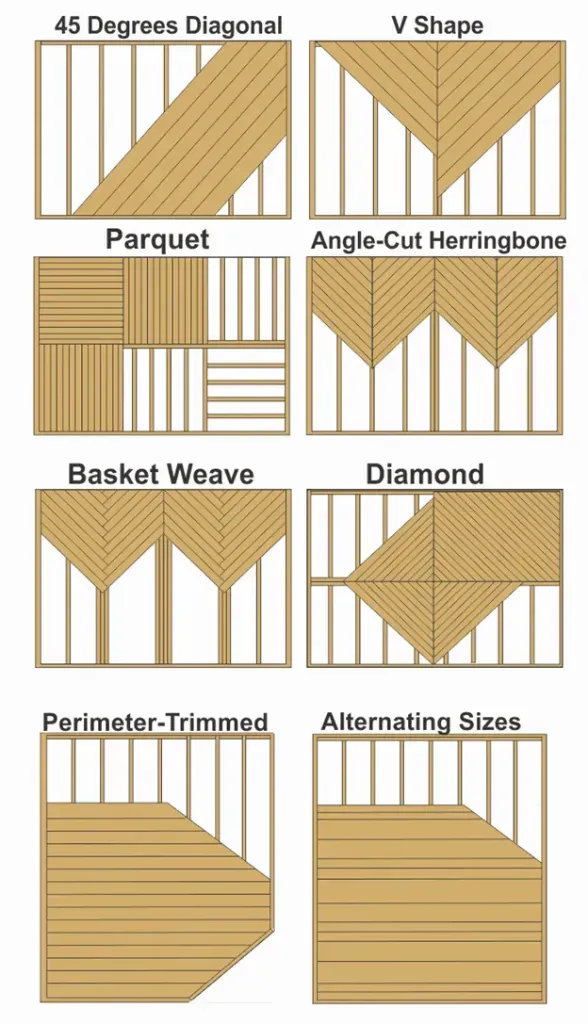
Here is a diagram of eight popular decking layouts. If you would like to see more of their designs, click here to go to their website.
One note about these diagrams. Most decking (1″ thick) needs to be supported at 16″ (400mm). Decking not running perpendicular to the joist increases the distance the decking runs. Meaning any pattern except for perpendicular decking requires a reduction in joist spacing. Increasing the number of joists needed. This fact is not shown in these diagrams.
How to Attach Decking
There are 3 common ways to attach decking.
- Face Screwing
- Edge Screwing
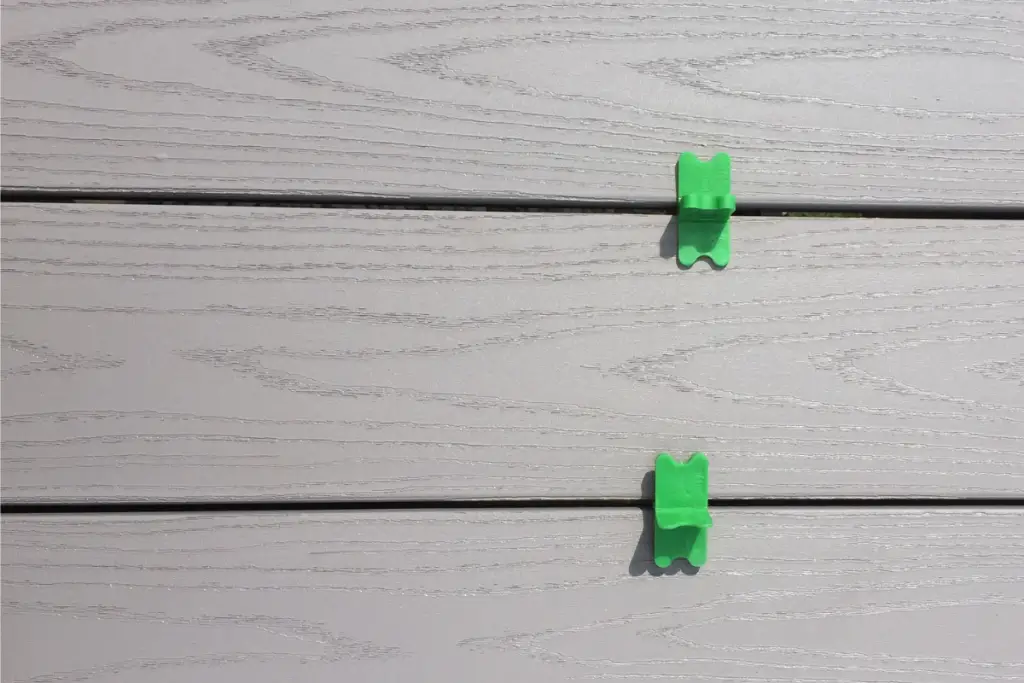
- Hidden Clips or biscuits
Face screwing is very common and has traditionally been the way to attach decking to the joists.
As the name suggests, screws are driven through the face of the decking into the joists. Specialized screws with a countersunk head are best, making the decking surface flush with the screw head. With most decking, 2 screws will be installed on each joist.
Edge Screwing is similar to face screwing, done on the edge of the decking. Screws are driven through the decking at an angle into the joists. The angle increases the is stronger than straight-driven screws but even better. Edge screwing hides the screw heads, improving the appearance of the deck boards.
Camo edge fasteners and screws make this much easier to do.
Hidden clips or biscuits. Not as common with wood decking, except maybe Ipe but very common with composite decking. Most brands of composite decking sell decking with a groove along the edge of the board for the clips to sit in, holding the boards in place. Improving efficiencies and appearance.
An exception for composite decking is Wolf which sells only square-edge decking and recommends installing it with Camo edge fasteners. Saving you money.
As hidden fasteners are fairly expensive.
Of all the brands, Trex’s biscuits are generally the cheapest and easiest to install. Fiberon’s Phantom biscuits are a close second, but with a slightly larger design better covering the top of the joists.
Timbertech, uses a metal clip and costs more and is slightly harder to install, but does have a slightly better grip on the decking. Compared to plastic clips, with a 90° screw.
When deciding how to attach your decking, it is important to consider your budget, the type of decking material you are using, and the look you want to achieve.
For example, hidden fasteners can be more expensive than face screwing or edge screwing, but they create a cleaner finish for composite decking.
All three methods can be used regardless of which direction you install the decking, but if installing your decking at an angle to the joists, adjustments will have to be made.
This is especially true for Camo Edge Faster. You will need to install the first screws and then slide the tool over lining it up with the joists below. As the tool holds the screws 90° to the decking, but the joists are not. Along with lining up the screw near the edge of the joists as the centre at an angle will break the edge of the joist. Making hidden fasteners or face screws a better option at an angle. Or just plan for some extra time.
Can I Change the Direction Of the Decking Boards From Parallel To Perpendicular?
You can change the direction of decking from one section of the deck to another as long as the joists are also adjusted for the change.

For a larger deck area, this can enhance the look of the deck by highlighting a change of area.
In some cases, rather than changing the direction of the joists blocking can be added to support the direction change. Costing more while increasing time but allows for a more custom look.
Is it a Good Idea to Flip My Deck Boards?
With wood decking, this is an option. As the top of the decking board can wear from the weather, dirt, and foot traffic. Flipping your deck boards will help to extend the life of the decking while saving you the cost of new decking.
It is important to note that flipping your deck boards is not as easy as it may sound.
This can only really be done with decking that is face screwed. And often, the screw heads, after years of use, will have filled up with gunk making it challenging, if not impossible, to back the screws off. Forcing you to use other methods to remove the screws, often damaging the decking.
Even if you luck out and are able to remove most of the screws and flip the decking, you are still left buying a few new boards to replace the damaged ones. New and weathered decking, even when flipped, will not look the same. Steps like sanding and staining and allowing them to dry out before installing can help but will add to the project’s time and cost.
Bringing us back to the old saying.
You can pay either with time or money
Flipping the decking will save you money but cost you time. A lot of time. Know which one is more valuable for you at the moment.
Is it Necessary to Lay Decking Evenly?
Yes, decking should be laid level between boards.
This is important for a few reasons, the main one being safety. If the boards are not even, it can create a tripping hazard as people walk across them. Using composite decking instead of traditional wood can help with levelling since it has more consistent dimensions than natural wood planks.
Should Decking Be Sloped?
With properly gapped decking, this becomes less important. As there is less than 5 1/2″ of decking for water to sit on. Often rain will naturally run off.
A slight slope of 1/16 to 1/8″ over a foot will help the water to run off. Composite decking often allows for 1/16″ or even no slope because pooling water is not determinantal to the decking.
A solid deck like Dura deck or vinyl membrane deck will need to be sloped to aid water runoff.
Commonly this is a minimum of 1/8″ over a foot but check with the product you are using before installing.
What Gap Should You Leave Between Decking Boards?
The gapping required between deck boards varies by material.
The ideal gap between boards for cleaning and water runoff is 3/16″ to 1/4″. So this is your end goal. The challenge is installations and accounting for shrinkage of the material.
With composite decking, gapping using hidden fasteners will give you the correct spacing, often 3/16″. Install the clips correctly, and you don’t need to account for gapping. Composite expands and contracts lengthwise but very little the width of the decking.
With wood, like pressure treated, it will often matter how wet the boards are. They may appear dry, but most decking coming from the mill will have 19% moisture content and will shrink roughly 1/8 to 1/4″ once installed on your deck. Meaning if you install the decking at the correct 1/4″ gap wet, you could end up with a 1/2″ gap after the summer.
Meaning it is often better to install with a slightly smaller gap, and 1/8″ to account for the expansion. Or let the decking dry out before installing, but this does run the risk of the decking warping and twisting in the sun.
Making it often better to install the decking with a small gap and hope it will shrink correctly.
Pros and Cons of Parallel, Perpendicular or Angled Decking Installation
When installing your decking, you have three main options.
Parallel to the house or perpendicular? Or even angled?
Each option has its pros and cons.
Running decking parallel to the house gives at a traditional aesthetically pleasing, blending into the house. Planning and deck construction will often be easier, along with costing less.
On the other hand, running parallel boards adds less pop to the deck design. It’s what you expect with most decks built with decking parallel to the house.
Perpendicular installation has some advantages. The major one is a unique design. When done correctly, it can really add character to your deck.
On the flipside, running perpendicular boards adds more complexity in planning and construction as well as adding more cost due to often requiring more blocking, beams and footings. As often, you will not be able to attach the deck to the house if the decking is not run parallel to the house.
Decking at an angle with the house can add visual interest to your deck.
Creating a unique look compared to the traditional parallel or even perpendicular style.

On the downside, installing decking at an angle will usually require more joists than either perpendicular or parallel designs, as it requires more decking support.
It can also be more difficult to plan and build correctly if you’re not experienced with building decks. To ensure that the decking is sufficiently supported and the additional blocking is installed. Cutting the right angles of the decking becomes even more important. Increasing the need for additional tools like a track saw. If you make the decking the star, it must have the appropriate level of craftsmanship.
Conclusion
When it comes to installing decking, there are three main ways to go about it – parallel, perpendicular or angled to the house. Each option has its own advantages and disadvantages depending on what you’re looking for in terms of aesthetics and budget.
Aesthetically speaking, angle is the most appealing, parallel the least.
Budget-wise, it’s the reverse. Parallel will cost you the least, angle the most. The one exception is if you have to build a freestanding deck to install the boards perpendicular, the additional beams and footings will quickly increase the costs.
Ultimately, what will work best for your home, in terms of appearance, budget, decking material, etc?
Enjoy your deck!