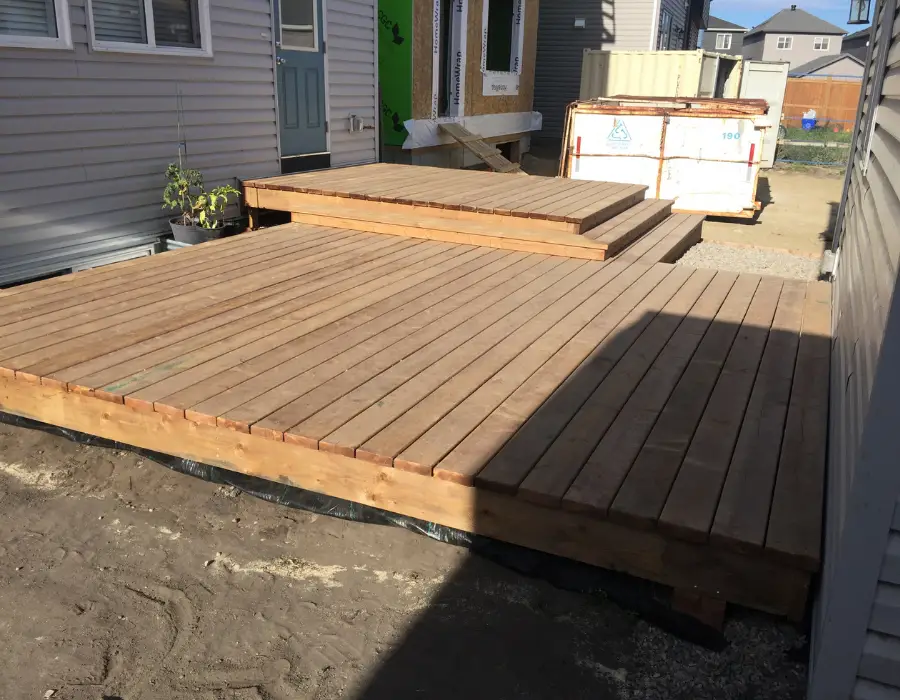
Low to the ground nestles between the house and the garage, this homeowner wanted a flat area to set up a few chairs and a table to enjoy being outside. Beside a raised deck attached to the house for his barbeque. A perfect arrangement for enjoying his backyard.
We chose a floating deck to lower the cost of building the deck. Because it was so low to the ground, it was not attached to the house it did not require frost footings. Which in Calgary is 4′ deep. By deleting the footings, the cost of the deck was reduced by over $900 while still creating a stable area to enjoy a burger with friends.
“What is a Floating Deck?”
A floating deck rests on the ground and is not attached to the house or any structure. A floating deck must be less than 30″ (762mm) from the ground in the US and less than 24″ (600mm) in Canada.
The single biggest difference when building a floating deck vs a freestanding deck is the depth of footings. A freestanding or attached deck must have footings dug to below the frost level. Where floating decks “footings” are set on grade. “Floating” with the changing seasons.
But if built right, despite not having frost footings, it will still be stable.
Let’s get to it then.
One thing unique about this floating deck is the type of footings. Instead of using the classic pier or deck blocks, I use treated 6×6 post to double as footings and a drop beam.
A drop beam is easier to attach joists to and hides the footings entirely under the deck. This is why I used 6×6 footings instead of concrete deck blocks.
Tools and Material Needed to Build a 12×12 Floating Deck
Before building a 12×12 floating deck, you will need the following tools and materials.
Material Used
14mm (1/2″) Washed/Drain Rock
6×6 Treated Post (2)
Landscape Fabric 200 sqft
2×8-12 Ground Contact (12)
2×6-12 or 5/4×5.5-12 decking (26)
#7 2 3/8 Camo Screws
3″ (75mm) Galvanized Coated Ardox Nails
Tools Used
Spade
Hand Tamper
Carpenter Level
String line
Stakes
Tape Measure
Carpenter Pencil
Chalk Line
Speed Square
Hammer
Circular Saw
Impact Driver and bit
Camo Marksman Pro (Optional)
Orbital Sander
I really like edge screwing decking. It improves the decking look by removing all those ugly screws, heads gathering dirt and rotting the decking. But many decks are still built with face deck screws. I still build the occasional face screwed deck when requested but prefer using a Camo Marksman Pro to make the deck look much better.
More on that later.
Also, I build decks professionally, so I get to use air tools instead of hammering nails by hand. But if this is a weekend DIY project, a hammer and 3″ (75mm) spikes makes a lot more sense.
Steps to Building a Floating Deck.
1. Prepare the area
The ground needs to be clean of any obstacles like rocks or mounds of dirt that will get in the way of building and levelling the deck.
This was made easier for me with limited vegetation. The grass had yet to be planted at this newly built house.
You can build over grass, but it should be cut as low as possible and covered with landscape fabric. The fabric prevents vegetation from growing under the deck by blocking sunlight.

Killing the grass before will minimize the potential of vegetation poking through the decking. A tarp on the ground a few weeks before construction or using herbicide are two of the most effective ways. For more ideas check out, Bob Vila How to Kill Grass.
Take note of the high points of the ground. Level them off as much as possible before laying the landscape fabric.
For me, the entire yard was graded away from the house, with the highest point being the corner by the house and attached deck.
Instead of digging out the entire yard, I decided to build the deck level to this point. Setting the top of the beam level to this point.
2. Setting the 6×6 Footings
Despite the name floating deck, we did not want to build a deck that would move. Which meant we needed to take a few extra steps to create a stable base.
A Stable base + Stable deck
All that to say, get this right.
You may not see it, but the deck will be floating on water. The water trapped in the soil or under the footing or beam.
Loam, often called topsoil with its high organic content, will expand and contract with every rain. So, the first step is to mark out where the beams will go and dig trenches to remove all the topsoil.
To make this easier, I hammered in stakes on both sides and ran a string line between. Giving me a reference to dig beside. For added accuracy and convenience, I levelled the string between the stake using a level.
*Builder Tip*
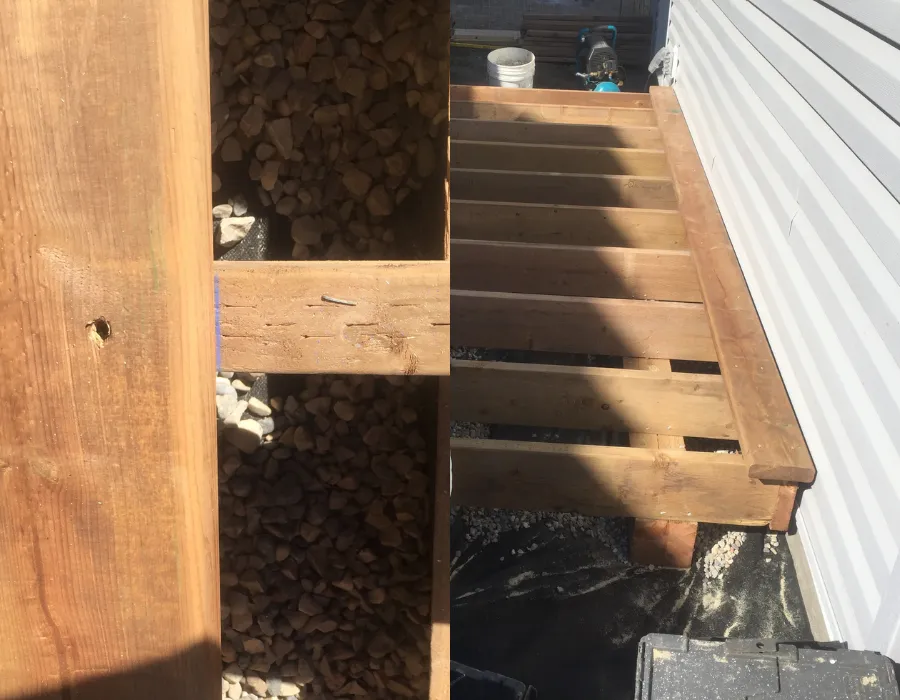
Construction is easier if you set a drop beam (6×6 post) back from the ends of the deck 1′ (300mm). Then cantilever the joists past the beam. This way, if the beam is not perfectly straight or parrel, it is hidden under the deck and doesn’t matter. Out of sight, out of mind.
I cheated and used the siding from the house as a height reference. But if building an Island floating deck, you just need to set the string line in reference to the highest spot under the deck and level out from there. Raising and lower the string on the other stake till level with the level.
Once the string line was set.
I dug the two trenches at a depth of the beam (6″/150mm) plus 2″ (50mm) for the gravel base.
With the dirt removed, I filled the trench with 2″ (50mm) of gravel. Raking it out with my shovel under the string line.
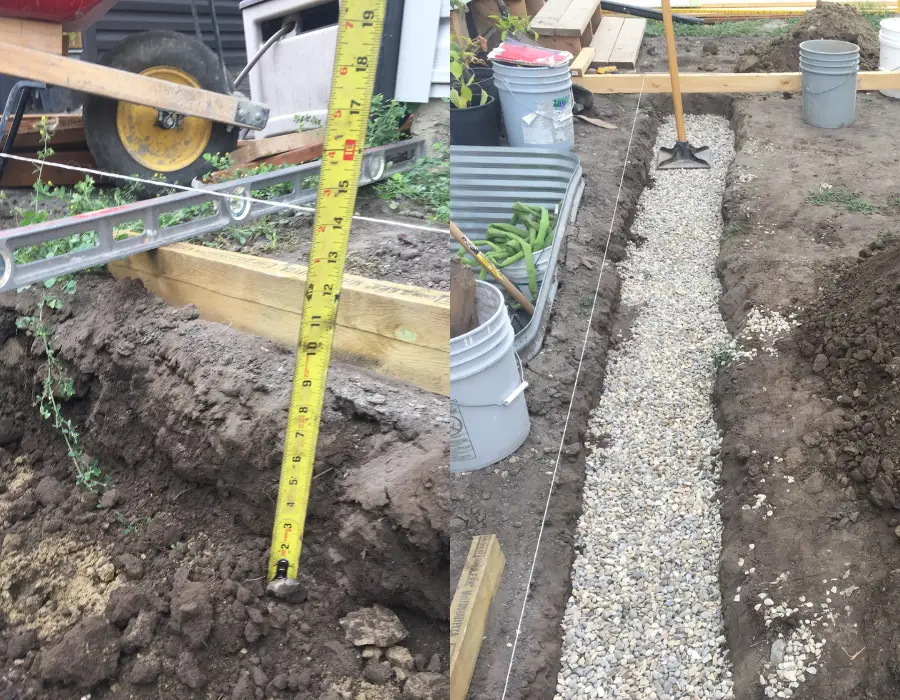
Then tamping it till a consistent height was achieved. Tamping both compacts the gravel and is better at levelling the gravel than raking or moving around with a shovel. With each rock levelled in place.
The gravel base is key for water drainage under the footing. Minimizing movement by creating room for the water, preventing frost heaves. The gravel also wicks water away from the wood, preventing rot.
Yes, the wood is treated for ground contact but removing water is more effective than any level of treatment.
The gravel also is easier to level than dirt. It took me a few tries to set the beam and checking with a level before it was right. But much easier rolling a beam out of the way and tamping the gravel a little more to get it level than adjusting the entire deck.
3. Building the Frame
Before framing the deck, roll out landscape fabric over the entire area. This will prevent grass and weeds from growing up again later. You can keep the landscape fabric in place with staples pushed into the ground or by spreading a thin layer of gravel over the fabric.
Just make sure that the gravel remains lower than the underside of the joists.
Once both beams were set, I was ready to start framing the deck.
I measure the distance between the garage and window well, minus 4″ (100mm). Three inches for the rim joist on both side and additional inch off to prevent the frame from squeezing the garage.
For a true 12×12 deck, the rim will need to be cut to 142″ and the joist at 143″. Not an actual 12′ square but will allow for full deck boards with a 1″ (25mm) overhang on all four sides. Or pretty close, more on the at later.
This deck was bigger, built to fill the space between the window well and the garage.
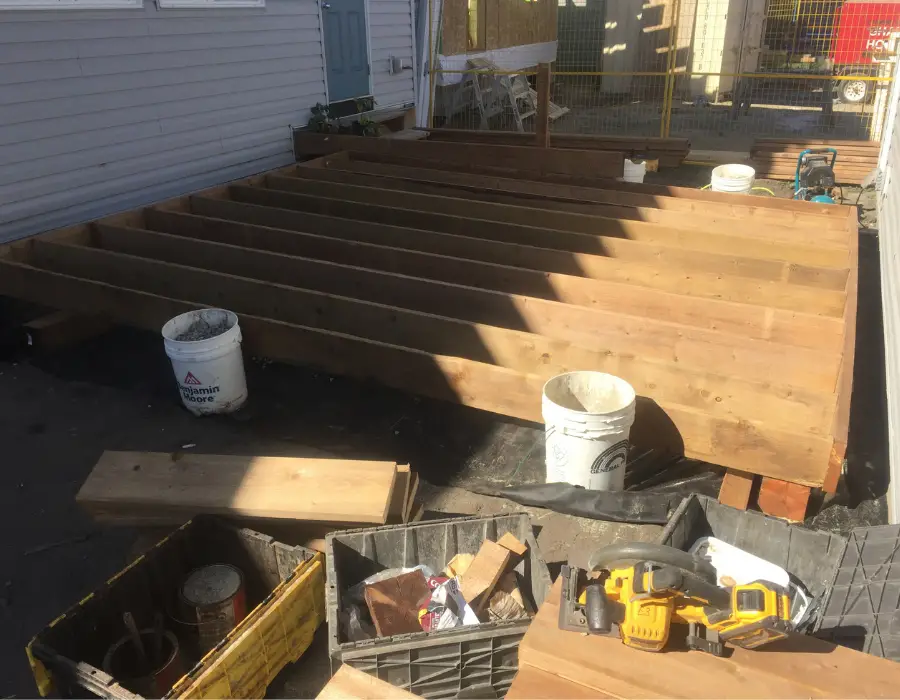
Before placing the rim in place, I laid at the joist as 16″ on centre. Hooking the tape on the end and then placing a mark every 16″ minus ¾”. Half the width of the joist, for the centre of the joists are 16″ apart. Run the line across the entire depth of the 2×8 (7 1/4″/184mm) for a reference to straightening the joists when nailing them onto the rim.
Setting the beam back also gave me room to arrange the joists on the beam and still use the spiker between the rim and garage wall. Nailing all the joists before sliding the rim and joists closer to the garage wall.
*Builders Tip*
Nails are stronger for shear load. The strain you put on the joist while walking on them or hitting the edge of the deck with the lawnmower. Screws are great for holding power. Like holding the decking down on the joist but are brittle against lateral force. If you want to use screws for structural holding, use structural screws. They have a stronger shaft that can actually hold shear pressure.
4. Square the Frame
Once both sides were nailed together, I squared up the frame by running the tape diagonal across the box. Sliding the rim back and forth till I got the same number for both sides. Before nailing the joists to the 6×6 I tapped the end of the beam till the lined up with the end joists.
Now I was ready to install the decking.
5. Install the Decking
Well almost.
It is rare to find straight decking, but it can be straightened out.
I wanted to start my first board by the garage, the most noticeable spot. I snapped a chalk line 4 ½” from the edge of the deck, parrel with the rim. Installing the decking straight to the chalk line while overhang the rim 1″. Also checking that the end of the decking overhung the end joist more than 1″ for I could trim them later.
Unfortunately, the garage wall preventing me from using MarksMan Pro, so I had to face screw the initial board. But after that, I was off to the races, edge screwing every joists.
Except it became clear after a few boards that my dimensions were not consistent. Which was fixed by measuring from the first deck board past the last board attached, adding the 5 ½” the width of the deck board. Snapping another chalk line to correct the next deck board too.
*Builders Tip*
Correction lines are still needed for composite decking, but the correction will be less with consistent decking dimensions. One of many pros of composite decking
To have a consistent measurement, I was forced to occasionally squeeze boards tight on one side with a huge gap on the other to correct them. I repeated this every few boards for the rest of the deck to minimize the adjustments.
Which made the final board consistently overhang the edge of the deck.
Options for Decking
I used pressure-treated 2×6. Because the homeowner wanted a beefer-looking deck with less flex between joists. Another option that is starting to overtake 2×6 pressure treated is 5/4 (actual 1″/25mm) radius edge decking for its cost savings. Roughly 30% less. The rounded edges are a nice touch, improving the look of the deck.
For less maintenance, composite decking is a great choice but is much more expensive. Trex, Fiberon and TimberTech have started making budget lines, but they are still about twice as much as pressure treated. But not having to stain them pays off sooner than you might think.
With the boards all screwed down, I snapped the chalk line for a 1″ overhang on both ends. Then trimmed the boards, making a consistent overhang.
*Builders Tip*
For a straighter cut, use a guide or jig to run the circular saw along. A track saw is ideal, but I have used a simple plywood guide that I line up with the chalk line for years. It holds the saw in place with a second plywood layer acting as a fence. It cuts straight every time at one-tenth the price of a track saw.
Cutting in place after installing ensures that all the boards have exactly the same overhang. It also creates a straighter finish line. There are just too many variables to control for the decking to be precut and still line up perfectly.
6. Sand the Decking
By edge screwing the decking, this was a breeze. A quick sanding of the cut edges, breaking the edge to remove splinters. A quick sanding of the few rough spots leftover from the mills, and I was done.
Well almost.
7. Staining
It is often assumed that pressure-treated wood does not need to be stained. Since it is already treated. But stain does 3 things the treatment does not do.
- Seals the wood against water
- Protects against damaging UV
- Adds colour to your deck
If you want your deck to last, stain it.
Click the link to learn tips and tricks for staining a deck.