The whole point of a good deck is to serve as a safe platform for outdoor living. You should be able to walk across a decking platform safely, even place furniture on it so you can sit, lounge, and eat outdoors – but if your decking is unsafe, it poses a serious health and safety hazard.
As a result, the structural integrity of your deck is incredibly important. You need to ensure that your deck can bear a lot of weight and that it is structurally sound. There are many different components to a deck helping you achieve this, and one of them is deck joists.
Building your own deck right takes some guidance to get it right. Here we will focus on how to install deck joists. One of my favourite parts of building a deck. With the deck’s substructure, the shape of your backyard oasis begins to take shape.
Which I am sure you are looking forward to so lets get to it for you can get to enjoying building your deck and then enjoying it for years from now.
I can taste the cool drink on my lips right now while sitting on a deck chair warming in the sun.
What Are Deck Joists?
First, let’s go over what deck joists are and how they work.
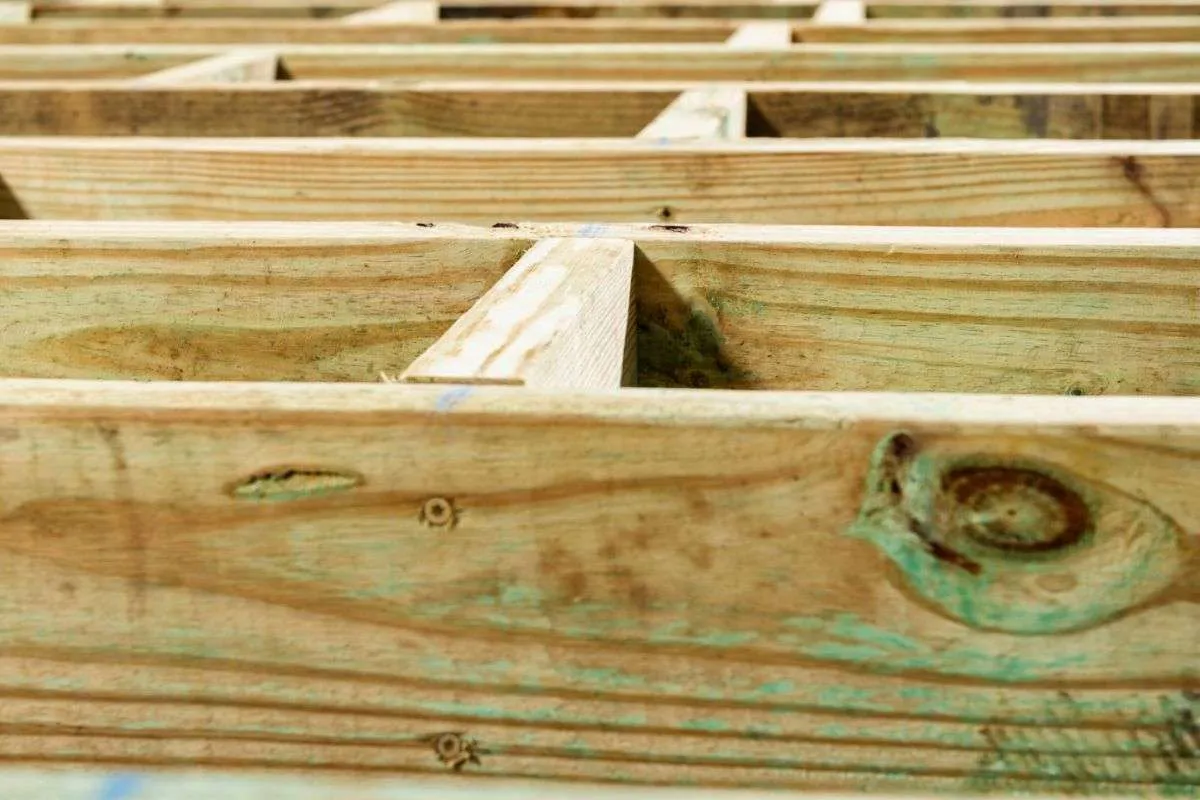
A deck joist is basically a board that is repeated throughout the frame of your deck and it’s used as a structural base.
Supporting the decking and attaching them securely in place, and transferring the load onto the beam, ledger and deck posts.
Deck joists are vital for decking, and without them, your deck would not be structurally sound. Falling right through your deck!
Made from pressure-treated lumber and spanning between the ledger and beam. Typical treated wood is Spruce/Pine/Fir (SPF) but in the western US, Hemlock is common because of its increased strength. The type of wood used should meet your local building code for span and load supported. But of course, this will vary by region.
Some decks are now being built using steel joists for their superior strength, durability and quality. But most still use wooden joists as they are more affordable and robust enough to get the job done.
The cost difference between the two will vary by season (wood is cheaper in winter) and market pricing. But do expect to pay more for steel joists.
Assuming you are going to build with wood joists, we will focus on them. Steel joists are similar in installation but with enough differences that you should read about them specifically.
First, before we get to installing, you want to make sure that you buy quality wood. Wood that is fairly straight, without any significant knot hole, crooks or crowns or bows. And is treated for exterior use.
If your deck is going to be close to the ground, less than 6″ between the dirt and the underside of the joists make sure to buy wood treated for ground contact. Sorry, not all pressure-treated wood is the same. If you are not familiar with the difference, click the link where I go into much more detail.
If you are satisfied with your deck joists, then you can start to look at installing them into your deck’s frame – but how?
Let’s get started with installing your deck joists!
Step One: Crowning and Grading The Joists
To prepare your joists for installation, you first need to identify the crown on each joist and mark it. This is because the joists must be installed with the crown facing up.
Crowns are basically bent in a joist and are formed by the natural bow in any length of wood. All joists have a crown, and they need to be installed facing upwards so the joist will be flat. If a joist is installed with the crown facing downwards, then the joist will cause dips in the decking.
Crowns goes ontop of kings heads. Wood crowns should always be up.
Things get worse if you install joists with some crowns up and some crowns down, as your deck’s surface will be wavy. Not only will this make your deck look uneven, but it will also feel uncomfortable to walk across. With composite decking, this slight difference will become even more noticeable.
To find the crown on your joists, you need to hold the joist vertically, flip it on its side, and look down its edge at eye level. You should see the edge bending upwards – that’s the crown. If not, then flip the board and check its other edge and then you should see its crown.
Once you have found the right side of the board with the crown, mark it with a marker pen on the edge of the joist, so you know which edge needs to be facing upwards when you install them.
Want to take it to the next level of deck building?
Then also sort your deck joists to size.
Sorry again, but wood varies in size. A 2×8 is not 8,” but even worse, they vary among themselves. Ranging from 7″ to 7 1/2″ and everything in between.
Sorting them and installing them will make your deck even more level.
Dr.Decks piles his all on end and then uses a level to sort the different sizes.
Personally, I just use my tape. And make the wood by 1/16″. If the board is 7 3/16″ I mark it with a 3. If it’s 7 and 3/8″, I mark it with a 6. Or you can right out the fraction if you like.
Either way works. The important part is that you grade and sort your lumber.
Step Two: Install The Side Rim (Edge) Joist
The rim joist is the outermost joist of your deck, so, they are the first to be installed. There are two types of rim joists – the first is the front rim joist, which is attached to the end of the joists and then runs perpendicular to them, and the other is the side rim joist which sits on the edges of your deck frame.
The first rim joist for you to install is the side rim joist.
Take it and place it, so the top of the joist is completely flushed with the ledger board. Using the approved fasteners for your decking (structural framing screws or nails), drive them through so they attach the rim joist to the ledger board.
Then, take the joist hanger or angle bracket of your choice and place it in the desired position. Fill in all the holes of the bracket, so your side joist and ledger board are secured to one another.
Another option is to cut your ledger 1 1/2″ shorter than your deck on each side. Then screw/nail the edge joist to the end of the ledger.
If you are using drop beams, one side of the joist can rest on the beam while you install the other side of the ledger.
Toenail or screw your side joist to the drop beam (or have someone else hold the joist flush against the beam for you).
For additional strength or if required in your area, secure hurricane tie to your joist attaching it to the drop beam. Remember to use the correct fasteners, either galvanized hanger nails or approved joist hanger structural screws.
The hurricane tie if required, is a very important connection that joins your joists to your beams, so it’s vital that you ensure your hurricane ties are connected securely. Using the correct fasteners. If not, then there’s a risk of your deck being uplifted in high winds or collapsing during earthquakes.
Continue this step for every drop beam you have, ensuring that each drop beam is connected to your side joists via a hurricane tie. With your rim joist now installed, it’s time to move on to the next step.
Installing all the joists with toe nails and then installing all the necessary hangers and brackets will save time. Just make sure that you have space to install.
Builder Tip
It may be tempting to install the ledger or flush beam hangers before installing the joist, but this will create problems in the future. Remember, your joists vary in height. Therefore hangers should be installed after the joists are installed flush to the top of the ledger. Ensuring the joist is level and fully supported by the hanger.
Step Three: Install The First Beam Block
Most trade deck builders install all their joists first and then go back to install their blocking. However, DIY builders sometimes find this difficult to do due to how you have to step over so many joists – so I’d recommend installing the blocking as you continue to move forward and install your joists.
Take your first piece of blocking and set it so it’s flush with the top of your drop beam. Fasten it in with structural screws or galvanized nails, and move onto the next block on the next drop beam.
Often bridge blocking will be installed mid-span or thirds, depending on joist length.
If you are picture framing the decking, additional blocking will be required for the picture frame board. Plus, the second joist in will need to adjust to accommodate the change. Click the link for complete details and how to picture frame a deck.
Step Four: Installing Your Joists Bridge Blocking
Local code will vary, but most require joist bridge blocking if the joist is longer than 8′. The blocking helps to straighten the joist and increase strength by transferring the load over multiple joists.
There are two ways to go about installing bridge blocking.
Similar to the edge joist block, you can measure each joist individually and install them as you install the joists.
Or you can install all the joists, snap a chalk line across the top of the joist where the block will go. Then cut the block and install them ahead and behind the line. This will make fastening easier.
If installing the blocking after, wait till the rim joist is installed as this will make them more stable to work off.
You can either nail the block in place, which is faster if you have an air nailer. But screwing the blocks with structural screws will increase strength, minimize squeaking and help to suck the joist tight to the block.
For cutting the block, do not measure them where they will be installed as the joist may be bowed and need to be straightened using the blocks before installing the decking.
Either measure the distance between the where fasten to the beam. Or cut them slightly smaller than the theoretical length.
For example, joists 16″ on centre will have space 14 1/2″ between joists. Cut the blocks 14 7/16″. Being slightly smaller will better accommodate slight differences between joists. For a large deck greater than 12′, do check after a few blocks that they are still on the correct on centre spacing. If not, do slight adjustments to correct it.
Step Five: Breaker Boards
Ideally, especially with composite decking, you want to design your deck to avoid butt joints in the decking.
This can be done by installing breaker points at intentional points on the deck by dividing areas to the lengths of decking boards with transition or breaker boards. With composite decking with 20′ boards, often this is not required, but with wood decking often coming in shorter lengths, this will need to be done more often.
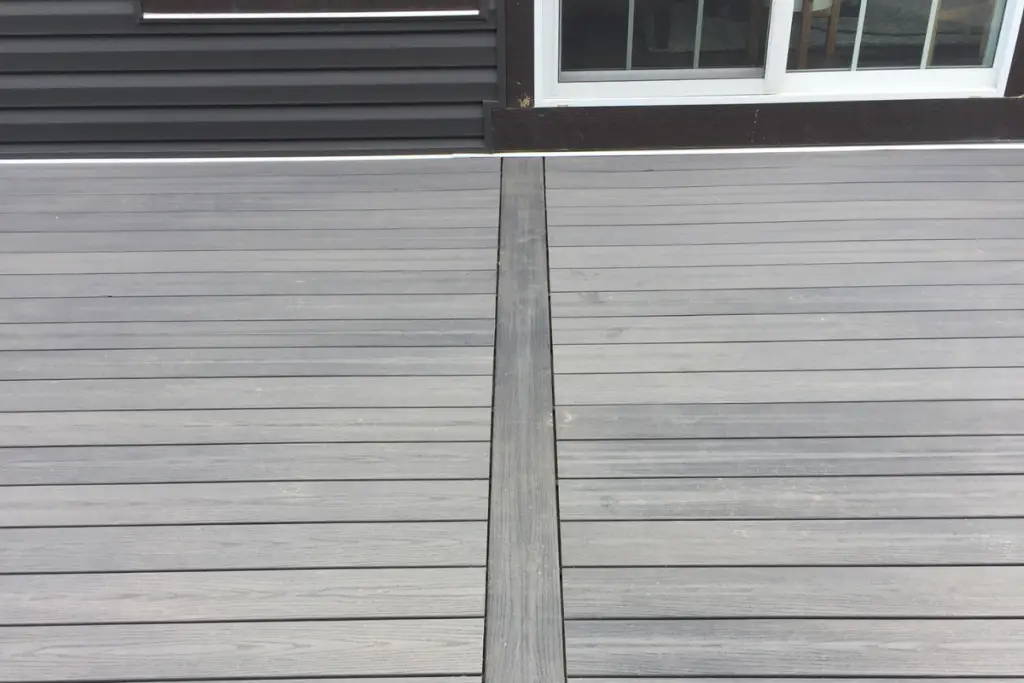
IMAGE OF BREAKER BOARD
But this can also be done to improve the aesthetics of the deck. Or define different areas of the deck, grill and dining area.
Breaker boards are a single decking board that is installed perpendicular to all the other decking boards on your deck’s surface.
Because they run perpendicular to the deck parts, parrel with the joists, they will need additional support.
Your breaker board configuration should be drawn into your plans, so you will know where to install the two additional joists to support the ends of your decking boards and the blocking for the breaker board.
For a single transition board, the space between the two additional joists should be 2″ bigger than the width of the decking, often 7 1/2″, to allow for drainage. This will also minimize gunge build-up in the decking gap.
For a single breaker board, install 2×4 or greater blocking on edge at the same spacing as the main joists, often 16″ on centre. For multiple breaker boards with an increased span between the joist, increasing the blocks to 2×6 or greater is a good idea.
Not all decks use a breaker board (especially if they are very small decks) so you may be able to skip this step entirely. However, if you do have a breaker board planned, don’t forget to add the additional joists underneath so all your decking will be supported.
Step Six: Cantilevers
Once your side rim joists and the rest of your deck joists are installed, it’s time to look towards the front of your decking. Before you can install your front rim joist, you need to finish your cantilevers.
By using a drop beam on your deck, you most likely have your joists running long and extending over the desired length of your deck. What this means is that you need to cut them back to your desired length, leaving the correct length of cantilevers that are fully supported.
To start, you need to measure out from the house the length of your decking. Make a mark where your plans say your deck should end minus 1 1/2″ for the rim board you will add after on both sides of the deck.
Snap a line a chalk line across. Draw a cut line with your speed or framing square down the joists were you plan to cut them.
Cut the joist to length using a circular saw.
Word of caution, you are working close to your saws blade. Be aware of where the blade is at all times and provide the required clearance to ensure you do not injure yourself.
Step Seven: Install The Front Rim Joist
Now that you have finished cutting back the cantilever, it’s time to install the front rim joist to the front of your deck’s frame.
End treat the cut end of the joists to reduce future rotting.
To help with this step, some people add a small block of scrap wood underneath the outside rim joists to serve as an edge to help make balancing the front rim joist easier as you fasten it to the deck. If you have someone to help you, then I would recommend you ask them to hold the joist for you.
Nailing or screwing it to the joist ends. Use a square to straighten the joist as in attach them.
If your deck is very wide and needs more than one piece of lumber to act as a front rim joist, then I recommend that you have the two joists meet in a bay (the gap between two joists in your cantilever).
To strengthen that splice, you will need to fit an extra bit of blocking behind it.
Also, it would have been impossible to connect that many fasteners into a single joist. So, behind your splice, add an extra piece of blocking and secure it to the 2 rims with the appropriate fasteners.
Step Eight: Check The Flatness Of Your Deck
Finally, with all your joists installed, it’s time to check that your deck is completely flat and even.
If you have crowned and graded your joists correctly, this stage will be easier.
A lot of builders tend to skip this step, but that’s a huge mistake to make. Check with a 6′ level or straight board for any unevenness. If any part of the joist are high, plane them down to the correct height. Click the link for more tips on planning joists if required.
If you do need to plane down any joists remember to treat them again, as most of the pressure treatment has been removed with plane.
Later, once you add your decking boards on top, you will have a nice even surface to walk across. However, if you skip this step, you could end up with an uneven surface that could ruin the experience of your deck.
So take your time and get it right now for you can enjoy it for years to come.
Final Thoughts
So, that’s it! Now you are ready to install your deck joists, including the side edge joists, front rim joists and required blocking.
On more tip, we only covered some of the main blocking, but many other locations will possibly need to be blocked to increase the strength or durability of the deck. Click the link to check if you have got all the blocking you need before installing the decking.
You can do this. Hopefully, this guide helps.
If not, find a good local deck builder to build it for you. Someone who takes pride in what they do and has deck-building experience to get it right.
Good luck and enjoy your deck.