There are lots of different techniques and methods to finish the ends of your decking . One popular technique is ‘picture framing’ or ‘bordering’ your decking.
If you understand, the steps is a simple way to dress up your decking.
Being one of my favourite ways to finish the ends of decking, especially composite. I am looking forward to sharing step-by-step how to picture frame your deck.
It should be fun, and hopefully, we can both build better decks after.
But first, let’s define terms to make sure we are both building the same thing.
What Is Picture Framing in Decking?
First, let’s just explain what exactly picture framing is.
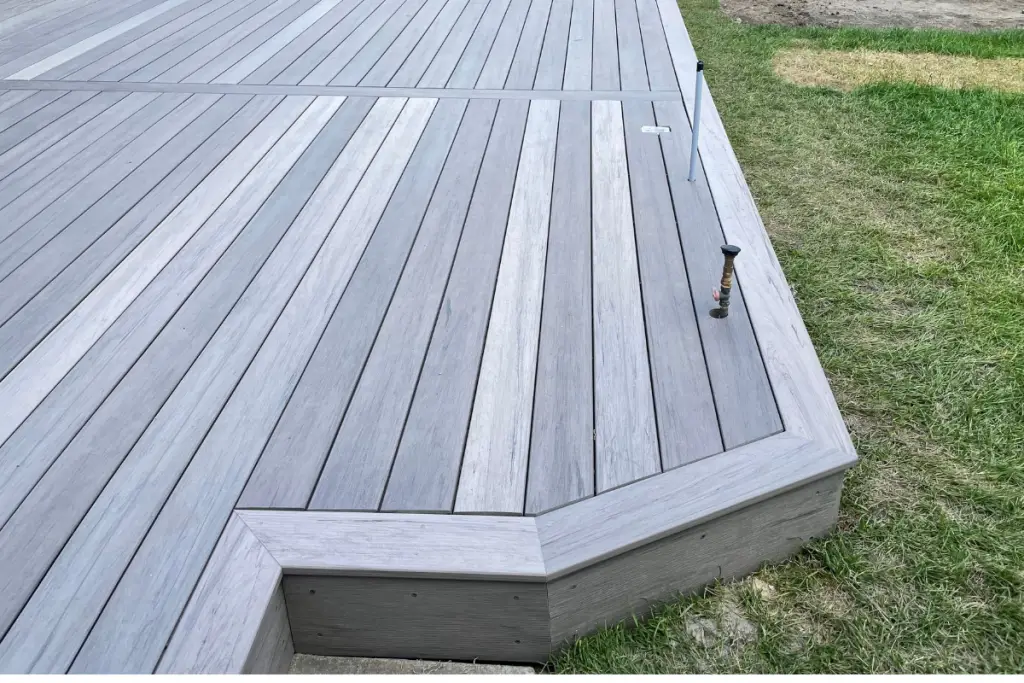
Picture framing (or bordering as it’s sometimes called) is a technique used in deck building to create a visual stylistic effect on your deck’s surface. It involves creating a square border around your deck, and then filling the inside of the border with regular deck boards.
The reason behind the name ‘picture framing’ is that the end result looks a bit like a picture frame that acts as a neat edge around your decking. Some people call this technique ‘bordering,’ but for the sake of this article, I’m going to refer to this technique as picture framing.
Some people also add additional frames. So instead of just one border around your decking boards, there can be two or three.
This can create a really great effect, especially if you are using multicoloured deck boards. However, for the sake of this article, I will be covering how to create a single picture frame around your deck.
So, now we are on the same page, let’s take a look at how you can picture frame your decking!
How To Get Started
Before you get started, it’s first important that you have built your deck’s frame and that everything is properly spaced and secure. Your deck’s joists should be spaced and blocked, and you are ready to start installing your deck boards.
Then it’s time to gather the tools and equipment you will need for this part of the project.
To minimize injuries, include all your safety equipment like safety glasses, gloves, and ear protection. Personally, I appreciate a good pair of knee pads. It just makes working on your knees that much more comfortable. And you are going to be on your knees a lot.
Make sure that you wear comfortable clothing (nothing loose or flowy that can get caught in your tools) and shoes that protect your toes.
Other tools you will need include a measuring tape, a carpenter’s square, carpenter pencil, chalk line with white or blue chalk and a utility knife.
Power tools required, mitre saw, circular saw, a cordless impact driver and drill. A track saw can improve the quality of the decking cut, but you can also use a saw guide. Or even a straight edge with some clamps.
Once you have everything ready, you can get started!
How To Picture Frame Your Decking
Here, I will be going through the steps in the process of picture framing decking.
Please take note that I will be covering how to make a single picture frame for decking in this section and that the sizes and measurements in this section are also rough estimates that could change depending on the size of your decking boards.
Picture Frame Blocking
Before you start laying your deck boards down, you need to first do some additional blocking. These will support the picture frame decking boards and provide material to fasten the decking to.
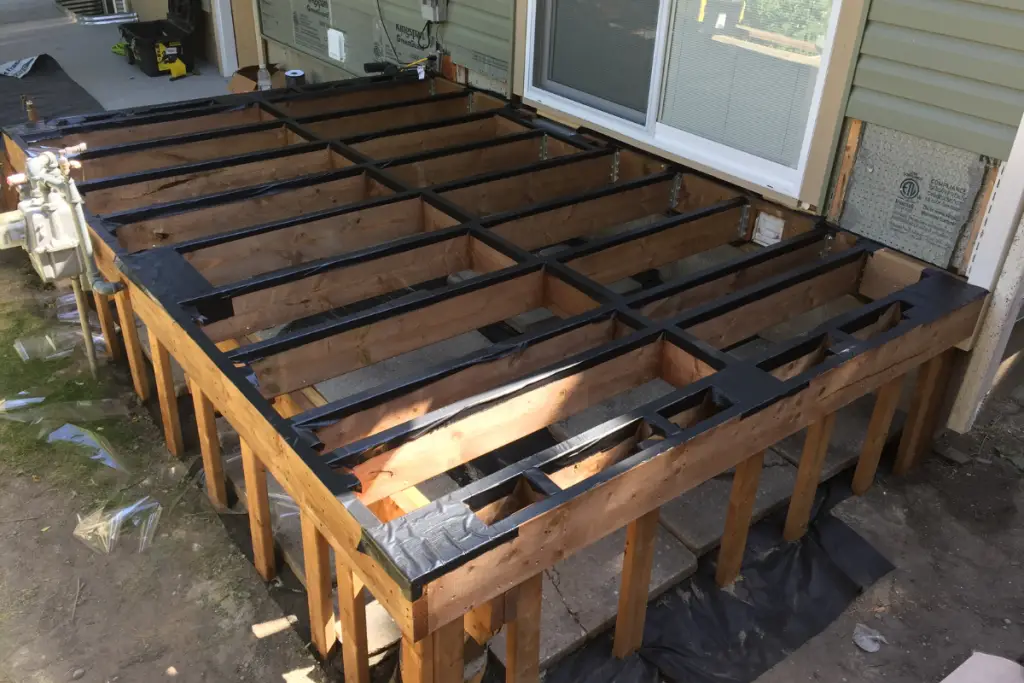
If you haven’t already installed additional joists for the picture frame, you will need to do that now.
For a single decking picture frame border, you will need a joist placed 5 1/2″ from the edge of the deck. Roughly the width of the decking. This will hold the picture frame blocking while supporting the field decking.
Then place a solid block (usually 2×6) on flat in each of the four corners of your deck. This will help support the mitre ends of the decking. Additional border boards will require a larger flat block.
If you are install face mounted deck railing. Now is a good time to install flat blocking where ever there is going to be a top mounted railing post. Often this can be the same flat 1 1/2″ blocking but can be upgraded to 4″ or 6″ post blocks for increase strength.
Builder Tip
If your deck is not a square, you will need flat block installed were ever you will have mitre joints (no matter its shape).
Then, add blocking around the perimeter of your deck at 16″ on centre where ever you are going to install the picture frame decking.
Because of the small span (5 1/2″), you can use 2x4s for these blocks. But using offcuts of the joists will reduce waste and costs, plus help to straighten the edge joist. These blocks should be installed vertically (on edge), not flat as to reduce water pooling in the decking gaps.
Before moving to the next stage, take a moment to walk around your deck and ensure every end of the decking will be supported. And that you have installed all the required blocking for all your picture frames, transition borders and railing posts. For more locations and tips on blocking installation, click the link.
Installing the Field Deck Boards Inside the Picture Frame
Yes, many YouTube videos show the reverse. Install the picture frame first, and then install the decking inside of your picture frame.
But you will have a better-looking deck built in less time if you install the main decking first. Especially if building a higher deck. The centre decking will provide a platform to work off as you install the picture frame border.
So we are going to install the main decking before building the picture frame.
To ensure your decking looks amazing, always leave enough material to trim the edges of the decking after installation on the joists.
- Except for the last two boards by the house, you will want to overhang the decking boards enough that they can be trimmed once installed. Often this is a 1″ or so past the joist set 5 1/2″ off the edge of the deck. Ideally, you are not cutting the decking till after installation.
- If it’s not obvious how far the decking needs to overhang, you can run a string line along the edge of the deck and butt the decking into the line, for you will always have material to trim off.
However you do it, make sure that the decking can be cut after being installed. This straight, consistent reveal for the picture frame board will make all the difference in the appearance of the deck.
- Snap a chalk line parrel with the rim joist 4 3/4″ from the edge of the deck to install the second deck board. The first one after the picture frame border, which will be installed later. With 5 1/2″ decking this will provide a 1″ picture frame decking overhang. Plus a 1/4″ gap between deck boards. If installing composite decking, check for allowable overhang. For some brands with smaller allowable overhangs, you will need to adjust the overhang. Just in case its often a good idea to check with a scrap piece of decking that the gap and overhang are correct before installing the decking.
- Place the decking beside the chalk line. Start fastening it down on one end, straightening the decking along the chalk line as required.
- After the first board is installed you can start installing the rest fo the field decking. Working from the decking installed by the rim towards the house.
- It’s a good idea to check every 6 boards or so that they are being installed evenly and straight. Small corrections can be made by adjusting gaping if required. This can be done by snapping a chalk line on the joist in front of whichever decking needs to be corrected as you work toward the house. Similar as done with the first deck board installed.
- Continue installing and correcting as required till the last 2 deck boards. 11″ or less from the house.
- Cut the last two boards to finish length. The width of the decking minus the two reveals for the picture frame boards. If you snapped your chalk line at 4 3/4″, this will be 9 1/2″. A circular saw cannot cut close to the house, so the decking will need to be cut before installation.
- Measure the width the last board needs to be ripped down to beside the house by slipping a full deck board under the flashing and measure the distance and measure the gap between the installed decking and the loose decking under the flashing. Rip the last deck board to this number minus 1/2″ (2 gap spacing.)
- Slip in the last ripped-down deck board under the deck flashing. Then install the other decking board that you cut to length already. Before fastening into place, check that you have the correct reveal on both sides for the picture frame boards.
- Face screw the last deck board by the house to the joist.
Now you have the main part of the decking installed. Now you just need to trim the boards for the correct reveal. Then you can start installing the picture frame boards.
Trimming the Field Deck Boards
With all the field boards fasten in place, now its time to trim to length.
Snap a line along the decking ends at the same distance you set the first deck board at (4 3/4″ unless it needed to be adjusted.
You want a perfectly straight-cut line here. There are 3 common ways to do this.
- Track saw
- Plywood jig to run a circular saw on.
- Clamp a straight edge/level/straight board on the decking the distance of the circular saw table away from the chalk line. Use the guide to run the saw along timing the decking to the correct length.
Regardless of which method you choose, set the saw blade at the depth to cut only the decking, not the blocks below.
With joists/blocking protected with joists tape. Cut the decking leaving a thin skin of material left, then finish cutting with a a sharp utility knife. For you don’t damage the joist tape.
Builder Tip
After cutting the field decking. Clean up the end cuts by sanding the sharp edge of wood decking or running a file with composite decking. Just enough to remove the burs off the cut boards.
Now you are finally ready to install the picture frame.
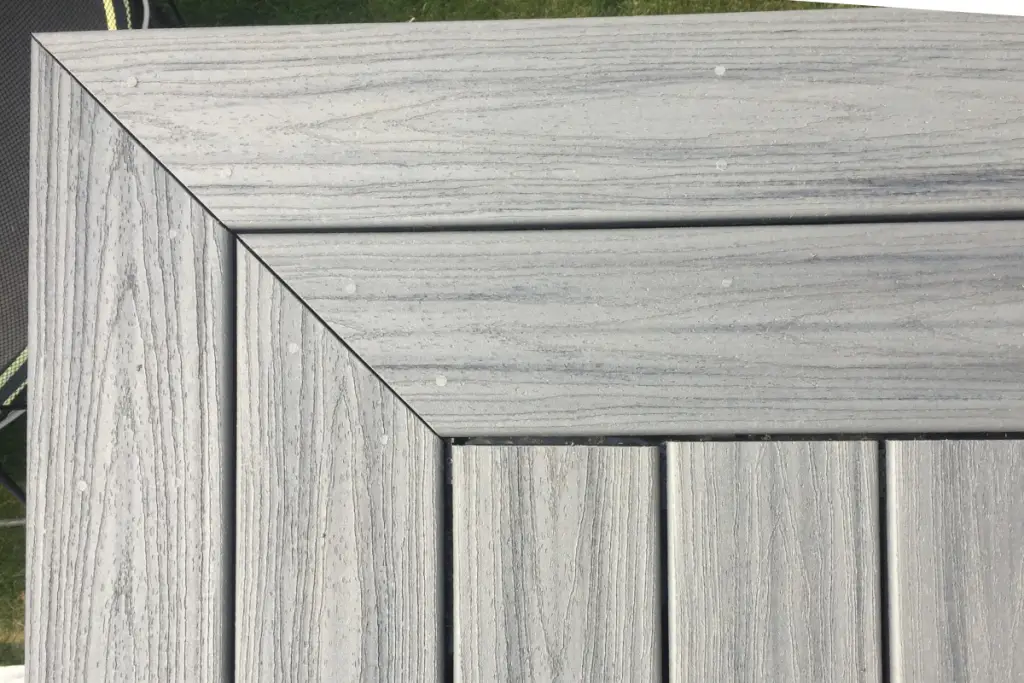
Cutting Your Picture Frame Boards
Because of the nature of mitre cuts, a mitre saw is the best tool for cutting picture frame boards.
The precision provided by a mitre saw is a must. The number of teeth depends on the type of decking (composite brands differ) but for pressure-treated wood decking, a general 32-40 tooth for 10″/12″ blade, 24 tooth for 7 1/4″ is ideal.
Using offcuts of decking, determine the exact mitre required. No deck is perfectly square, so even with a square 90° corner may need minor adjustments to meet perfectly.
Once you have figured out the exact mitre cuts. Measure the long to long length of the front decking board. With a rectangle deck, this is the one sitting on top of the rim joists. Measure the length of the rim joists, add the overhang for both sides (1″overhang x 2= 2″). Cut this board and place it into location on the deck. Ensure that it has all the correct overhangs.
Measure the side boards from the house to the long point of the front deck board.
Cut these 2 sideboards.
Set in place, checking that all the overhangs are correct.
Fasten Your Deck Boards Around The Picture Frame
Most picture frames will be faced screwed. With some composite brands, the screw heads can be hidden with cortex plugs or equivalent.
Whatever you choose, start at the mitre joints. Keep the ends screws back 3/4 or 1″ depending on the composite brand or wood. Mark and predrill to minimize splitting of the decking. Then fasten the boards down with the appropriate screws.
Marking the screw locations on your speed square with a felt will help speed up installation and improve consistency.
Builder Tip
Work your way along the decking from one mitre cut to the other side, installing 2 screws into every joist or deck block.
Double And Triple Framed Decking
If one picture frame border around your decking is not enough, then here’s some advice on how to add an additional one or two borders.
To do this, you will need extra materials, in particular material for blocking around your deck. The only real change in adding a double or triple frame to your deck is that your decking will require longer blocking to support the boards.
So, here is what you need to do.
Double Framed Decking
Increase the blocking length to 11 1/4″ for most decking and move the second joist far enough to accommodate the larger blocks.
Also, the corner blocking will need to be larger to support the entire length of the mitre joint fully.
Triple Framed Decking
Increase the blocking length to 17″ for most decking and move the second joist far enough to accommodate the larger blocks. Because of the span, you should use boards no less than 2×6 but often larger. Matching the joist will be better.
Increase the corner blocking size to support the entire length of the mitre joint fully. Often this will require using 2 flat blocks.
Installing Multiple Picture Frame Deck Boards
With double or triple picture frame boards you will start by cutting and installing the decking beside the field boards and working your way out. the smaller boards followed by, the larger board.
Rather than your overhang determining the boards’ length and placement, the gap between the decking will be added to the short of each mitre cuts.
Ironically but something to keep in mind doubling or tripling the number of boards will increase the installation time considerably. More than just double or triple.
Measuring and cutting will require more check and finessing to get it right. It will add to the look of the deck but will require additional time.
Multiple Picture Frames In One Deck
Another technique often used in picture-framed decking is having more than one picture frame in the same deck. I’m not talking about creating a double or triple border around your entire decking – instead, I’m talking about having multiple picture frames running side by side.
Sometimes this is known as a breaker or transition board. But the point is to run a full decking board “breaking” up the decking boards.
Most commonly, this is done to remove butt joints from the decking. With the decking broken up into areas that a single length of decking can cover.
Some people use this technique so they can run their decking boards in different directions to create a really interesting floor pattern. I’ve seen some deckings use this method to create walkways or paths through a larger deck, or put multiple squared picture frames side by side to make a checkered pattern.

It just goes to show how much versatility there is to this method. – so how can you do the same?
You can lay your deck boards in any style and direction, but it’s vital that you provide the support needed beneath the boards by adding the required additional blocking. Taking a little extra preplanning but greatly improving the appearance of the deck.
Final Thoughts
Picture framing your decking requires a lot of pre-planning in order to ensure that every piece of decking is properly supported. As a result, it may not seem worth the hassle – but the end result is so aesthetically pleasing and can totally transform your decking’s appearance. Making it well worth the extra time a material needed.